I am an insatiable photographer. I have the fear...you know the fear that if you don't capture that perfect shot as and when you see it, you may never come across a moment like it again! Yes that fear that drives me to constantly whip out my phone or camera at EVERY opportunity!! There, I've said it. Feels like a huge weight lifted off my chest, just to say it loud. Mr Fantastic hates this habit. He takes a photo once a fortnight. But then he is obsessed with BBC Sport, which he checks every 3 minutes. So there is that.
Every now and then its good to switch things up. We are incredibly lucky to have FAR too many lovely holidays in Greece (as seen here!). So on our last trip (before Baby Fantastic joined the family!), rather than simply add to the terabyte of photos I already have of all the Greek Islands, and all the colourful fishing boats on said Greek islands, I decided to do something a little bit different. So instead I captured our trip through a series of short video clips. Again I ended up with hours of footage and a phone with NO memory left, but having sifted through them to pull out all the gems, I've pulled them together into this little video:
Aquila Ionian May 2016 - med from Marian Needham on Vimeo.
So now I'm off to experiment with capturing more videos. It seems I may have simply switched one unhealthy obsession for another (very similar one!). Seems you can't win them all. ;)

Tuesday 18 October 2016
Wednesday 12 October 2016
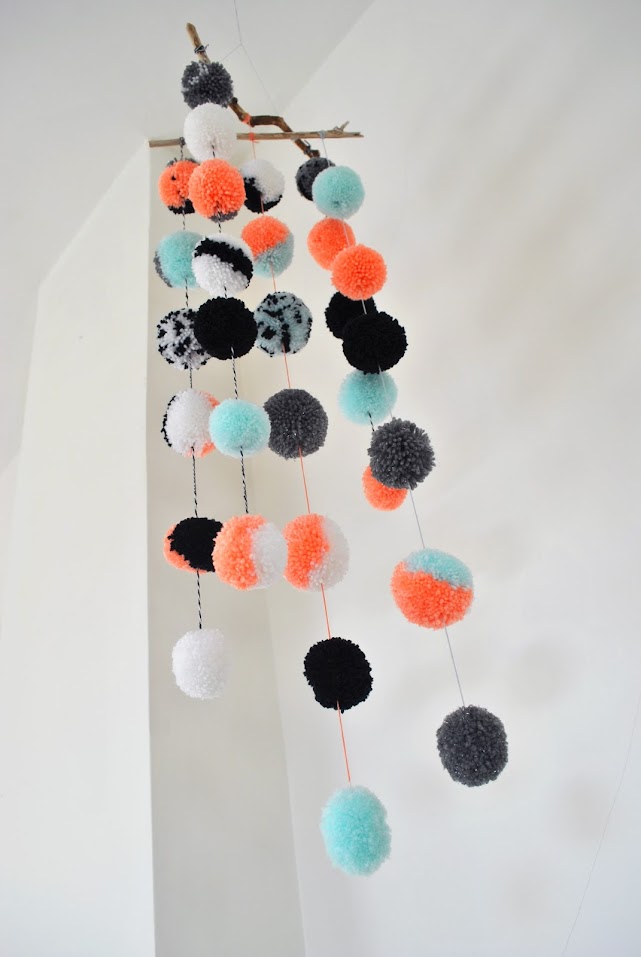
DIY - Pom Pom Mobile
This is a lovely simple DIY that is simple, fun, a little addictive and can produce gorgeous results. I had been hankering for some pom-pom action for a while, so when I stumbled across some pom-pom based mobiles on Pinterest, I decided to dive in.

I used a series of wools that I found in our local charity shops and discount stores (no doubt there are a few acrylics in there, but these are not for wearing next to the skin so I was less concerned about that). Once I'd found a colour combo I was happy with (and was unisex, since at this stage we don't know if we'll be blessed with a baby boy or girl!), I dove right into the pom-pom making.
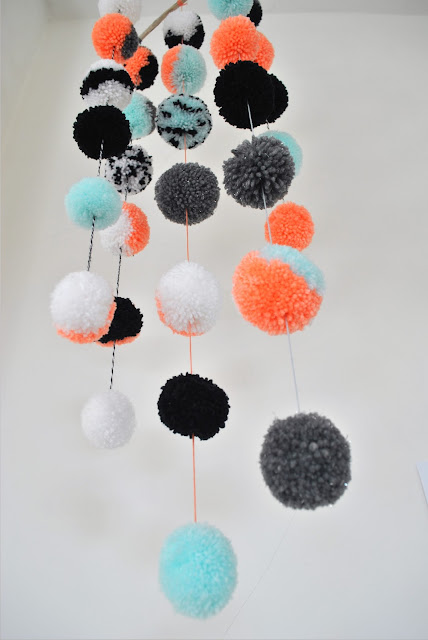
This is perfect crafting to do in front of the tv, on long haul flights, or long train journeys, during down time or on a chilled out holiday. I started ours on holiday in France with the family sat around the pool and sheltering from the midday sun. (I should caveat this - it was BEFORE our munchkin arrived, trying to fit in a gazillion pom poms into our daily routine now would be quite a feat!)
In fact, it became a full on family affair - everyone helped by creating a pom pom each and they are ALL included in the final article, even those made by our adorable 3 year old nieces and nephews! I love the fact that I can point out which pom pom each of them made. It's all the more special that everyone was able to contribute to something our little munchkin will hopefully come to love and stare at just as much as us!


Keep going until you can't squeeze any more yarn on! The more you fit on, the fuller and more bushy your pom poms will be. But if you are looking for a looser, less full look then you can keep your wrapping sparser. It's great to experiment at this stage to get the look you want.


In fact, it became a full on family affair - everyone helped by creating a pom pom each and they are ALL included in the final article, even those made by our adorable 3 year old nieces and nephews! I love the fact that I can point out which pom pom each of them made. It's all the more special that everyone was able to contribute to something our little munchkin will hopefully come to love and stare at just as much as us!
So, gather any back-up you can find...family, friends, pets and start pom-poming (yes I did just turn that into a verb, embrace it).
Here are the key steps for the process:
1. Gather your supplies.


You will need yarn in the colours of your choice. I chose 5 colours and probably used about half of each ball of wool for this project (for about 30 fairly small pom poms). So depending on your ambitions, you can adjust accordingly!
I also used cardboard (from a handy cereal packet) and a large fork (our pasta serving fork in my case!) as my templates for the pom pom making.
You'll need the usual basic suspects like fabric scissors and a chunky needle.
And finally you'll need something to hang your pom poms from. This could be some small pieces of drift-wood as in our case, or a embroidery hoop or a hanger moulded into shape etc. Anything you can hang from the ceiling and tie your pom poms on to will do the trick!
2. Create a cardboard template.

To create the cardboard template I simply cut out a circle in the desired size out of think sturdy cardboard. You'll need two perfectly matching circles. Then cut into the centre and remove a slightly smaller circle from the middle.

The diameter of the cardboard will roughly equate to the diameter of your pom-poms at the end of the process, but this is just a guide. You can trim your pom poms afterwards to any size you like.
Starting in one spot, wrap your yarn around the cardboard template slowly working your way around the full circle.

Keep going until you can't squeeze any more yarn on! The more you fit on, the fuller and more bushy your pom poms will be. But if you are looking for a looser, less full look then you can keep your wrapping sparser. It's great to experiment at this stage to get the look you want.

Once you have a full template, take your fabric scissors and snip your way around the outside of the circle, using the split between your two cardboard rings as a guideline to keep you on track.

Finally, to secure your pom pom, take a short piece of yarn, wrap it between the two cardboard circles and then tie tightly in a knot. This should collate all the short strands of the pom pom together and allow you to ease the cardboard circles off without the whole pom pom falling apart!
Then ta-da you have your first pom pom!
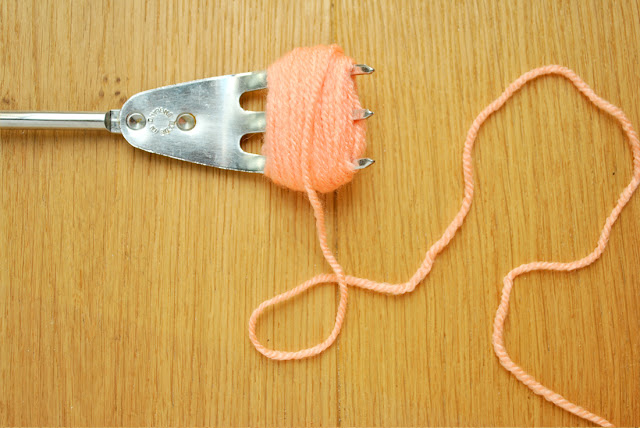
3. Or find a large fork for smaller pom poms.

I ended up creating poms of two different sizes - larger ones at about 2 inches in diameter and slight smaller ones at about 1.25 inches in diameter. But you can experiment with and shoes and sized you fancy. I found that our pasta fork worked superbly for the slightly smaller sized poms, so raid the kitchen to see what you can find!

Finally take your fabric scissors and snip your way around the longest part of the yarn as you did before with the cardboard versions. And that's it!


In this example simple wrap the yarn around the widest part of the fork prongs as in the above image.

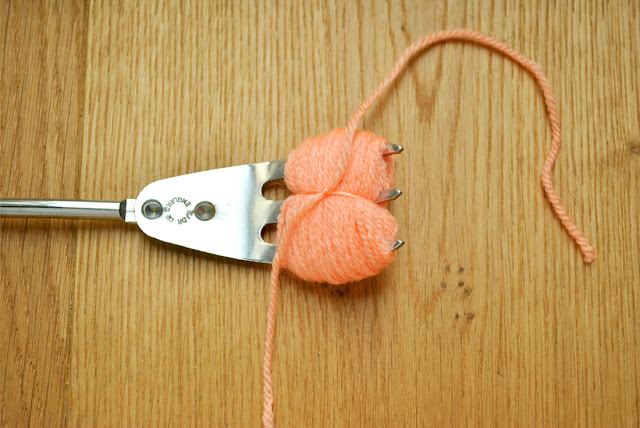
Once you have as much yarn wrapped around your fork head as is possible, then tie a short length of yarn around the bulk of the wrapping and secure as tightly as possible. You can then slip it off the fork prongs to leave you with a neat circular wedge of yarn like this:

Finally take your fabric scissors and snip your way around the longest part of the yarn as you did before with the cardboard versions. And that's it!

4. Trim
5. Build up a stash of pom poms
Your raw pom-poms will likely look a tad shaggy and lopsided once you've cut them off the template/fork. This is where you need to get creative with the scissors and even out the pom poms into nice smooth balls. Alternatively you could opt to leave them all (or a few) more shaggy or lop-sided if you want a more relaxed, alternative mobile. I have seen some of these done really beautifully.

Your stash can be as large or as small as you like (or you have time for!). Just be warned that pom making gets a little addictive after a while so it gets harder and harder to stop!! You can keep your poms in block colours, or experiment with combinations, patterns and textures.


6. String them up
Finally, once you're happy with your full selection of pom poms, tit's time to start stringing them up. You can use bakers twine, embroidery threads or simple sections of the wool you used for the pop-poms to do this. I experimented by laying out the poms in four of five strings to try and visualise the pattern/shapes they would make. Once you're happy with your arrangement you can start to string them up.
I found the easiest to start with is the bottom pom. I made a large knot in the end of the hanging thread and then used the final tied-off yearn on the pom pom and knotted it around the end of the hanging thread. This means the large knot stops the pom pom from slipping off and the pom pom is securely fastened in the middle on the pom to ensure it hangs evenly.
For the rest of the poms on each thread, I started by creating another knot right at the height I wanted the pom to rest at. I then used a large needle to thread the hating yarn through the centre of the next pom. The knot created stopped the pom slipping right down on top of the previous one.
Repeat this final step until you have your desired number of poms on your having thread. Mine ranged from a bout 5-8 as I was keen to keep them all different lengths for visual interest.
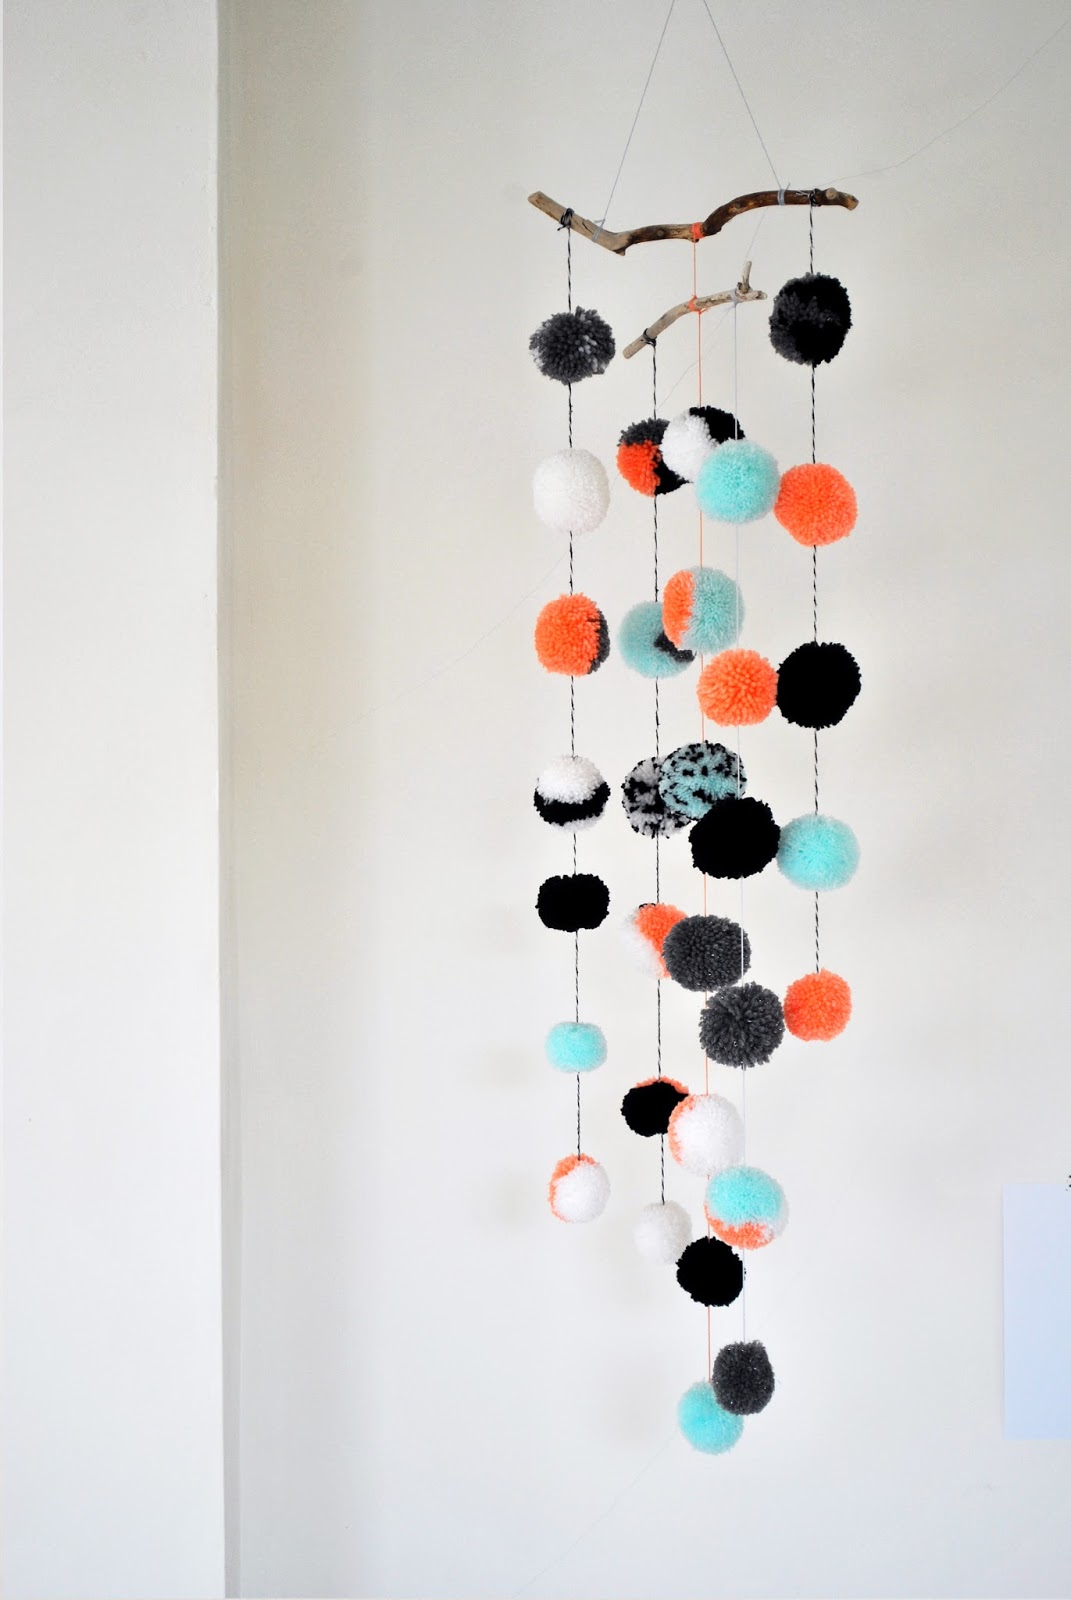
7. Bring it all together


Finally attach each of your hanging threads to your drift wood, experimenting with the arrangement as you go until you are happy and tie them off tightly. I found it suprisingly easy to get the drift wood to balance - you can simply move your having threads in or out along the driftwood until they balance and the driftwood stays horizontal. Not that this is essential - some funny angles all add character!
8. And Hang!


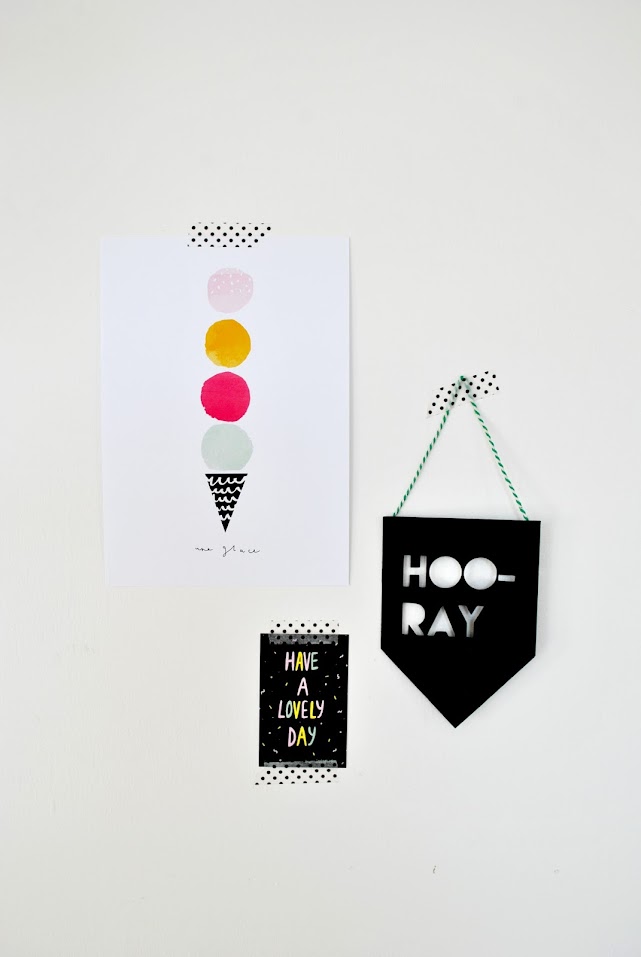
Last but not least, hang your beautiful new creation. I'd heard that it's not a great idea to hang mobiles above little people's cots, so as an alternative we hung this above our changing station as the little one will always be supervised on here but is likely to need some distraction as we expose it's bare bottom for cleaning!!

Then sit back (or lie back if you're the little one) and admire the finished article. Ours only takes a tiny movement to keep it spinning and dancing for ages - a sure fire distraction!

Finally, here we have it in action below!
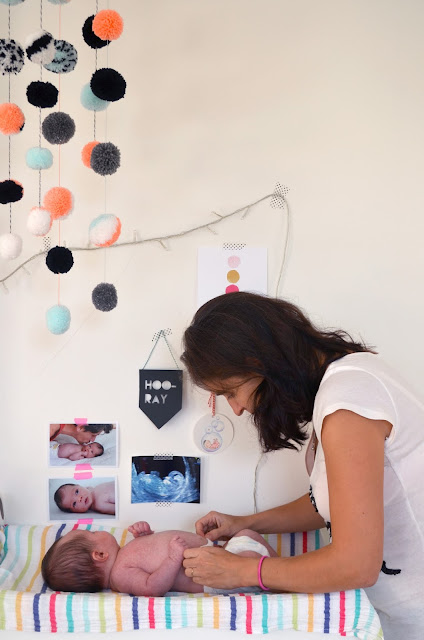
If I'm completely honest, I thought this mobile would be purely for my fancy and to decorate the nursery, rather than actually get any real use. But the little lady loves it and is fascinated by it hanging above her changing station. Thankfully it really contributes to our calm, peaceful nappy changes! Phew!


Tuesday 11 October 2016
Welcome Little One


The birth was an eye opening experience. Primal and mostly tackled at home. I found my pain threshold, which is something I've always been interested in! Ha!
The TENS machine was my best friend for a good 24 hours after which I ditched it like last night's takeaway and took the last 12 hours on the chin like a woman. Unfortunatley after 36 hours of going it alone, with no intervention or drugs, we were whisked into theatre for a spinal and forceps. Nah!
But who cares, when they plopped the screaming tiny being on my chest, I couldn't have cared less how she arrived. Just that she was here, with us, healthy lungs and all, and ready for some wonderful adventures with us.
I final feel like one of the mum club. Although a slightly fraudulent memeber - like my pram just has a teddy that I'm pushing around the park. Until she squeals and squawks from the depths of her pram and reminds me that I have real responsibilities. To make sure she's fed, watered and washed, every 2 hours. Like clockwork. Like a never ending wash cycle.
Aha, yes that club.
Aha, yes that club.

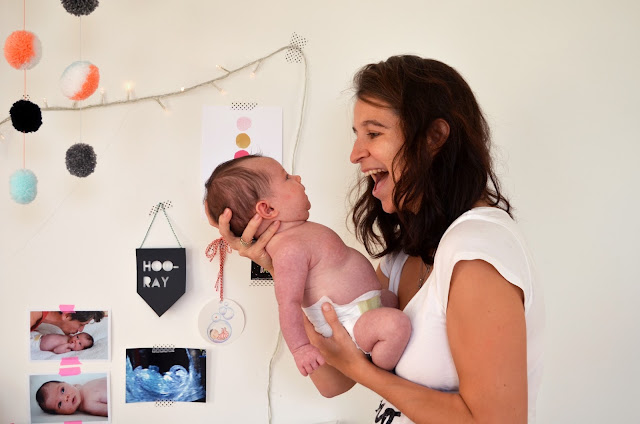
She's been with us a month now and already she's changed so much. No longer all arms and legs and bird-like, she's developing chubby cheeks and is already more robust and making her presence we'll known!
I've taken almost 500 photos of her, we might need a new hard drive solely for her portraits!! And even still I'm paranoid about failing to document one particular facial expression that she's surely about to grow out of and we'll never see again! I may calm down eventually. But, in the mean time, I think I need to invest in more memory cards.
I've taken almost 500 photos of her, we might need a new hard drive solely for her portraits!! And even still I'm paranoid about failing to document one particular facial expression that she's surely about to grow out of and we'll never see again! I may calm down eventually. But, in the mean time, I think I need to invest in more memory cards.

So welcome to our world little Georgia Grace, you adorable tiny human being. You make it a more joyful and sunny place to be. You fill up our lives and make us a family, we'll never be the same again and for which we will be eternally grateful. All our love, always.

Sunday 28 August 2016
Baby's First Romper
I have been on a bit of a sewing frenzy the last few weeks, so it's high time I shared some of my creations! Every time I think about starting something new, e.g. preparing a blog post or actually getting stuck into some creating, the hands on projects always win over! So I have produced a bit of a backlog of sewing projects that I'd love to share.
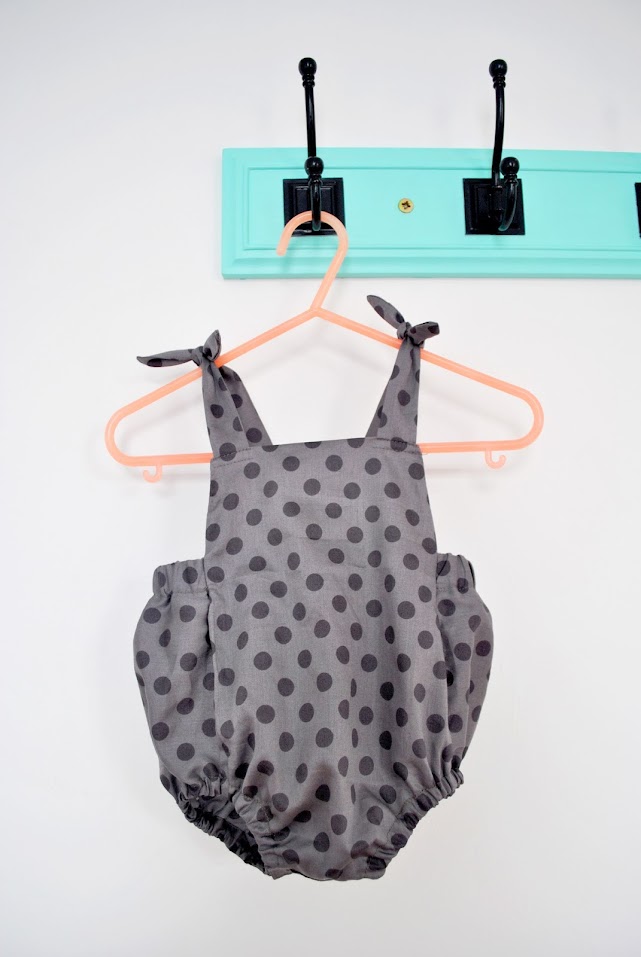
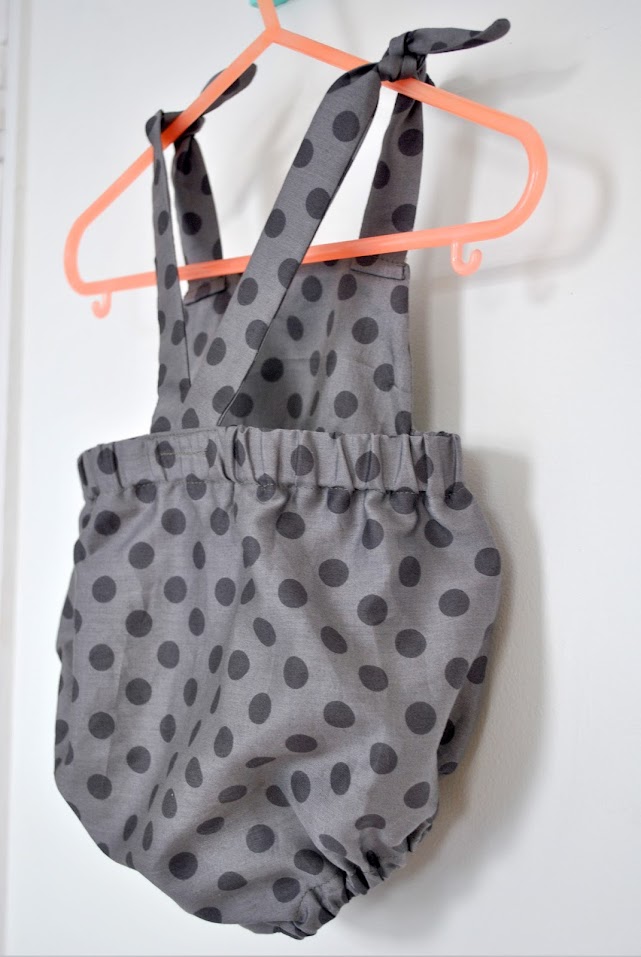
This is hands down my favourite and therefore it gets to go first! It's baby's first romper suit!
It's been absolutely baking August here in Blightly (so unusual!) so I figured a little light romper would be exactly the thing to welcome baby home in. (Okay, so I know full well this little munchkin isn't going to give two hoots about it's first outfit! But, I have a sneaky suspicion that I sure will!)

I used a lightweight cotton in neutral, unisex colour way that I dug out of my fabric stash (great think about baby clothes is they don't need so much material - perfect for recycling old men's shirts etc!). We can always mix it with a blue or pink vest or cardi down the line once we know if it's a boy or a girl (or we can add green or yellow for that matter. In fact, I'd probably prefer one of those!).
I created my own newspaper pattern by drawing around each panel of an existing romper we were lucky to inherit. I simply added a seam allowance around the outside of each panel as I went along. Then I tried to follow it's structure to make this one. Sometimes it's a little tricky to work out what order to sew things up in, but a spot of unpicking here and there never did anyone any harm did it?!?! ;)
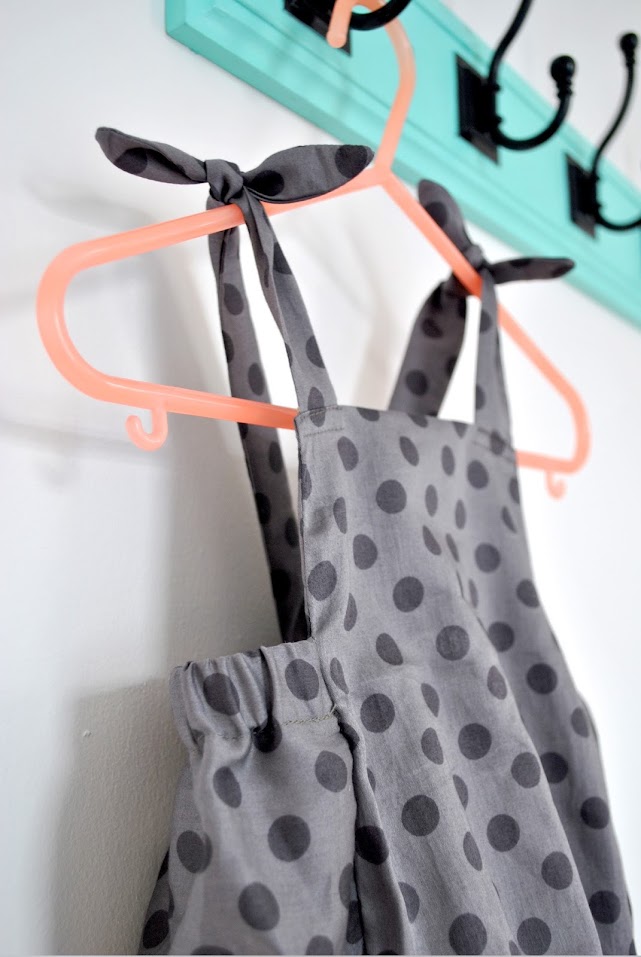
I changed ups few things, for simplicity's sake! For example the original had button fastenings not the front, which I switched for simple tie straps - in fact I love the cute little ears on the knots at the top of each shoulder so I think that worked well! Also, the original had a single strap that split half way up the bag, which I simply switched for two separate ones going directly from the waistband. Again, don't think we've lost anything there.

Since we have no clue what sort of size our sprog will arrive at, I was paranoid about spending hours slaving over something that would never fit! I also have no clue whether the template romper was large/small for it's size, so I was generally pretty generous with my pattern adding a fair cm to the important spots to make sure it gets at least ONE wear!!! Figured it can always grow into it...
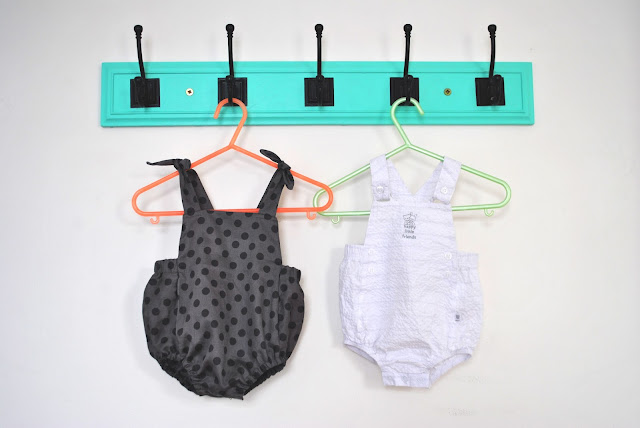
For comparison purposes here's a shot of them both side by side:
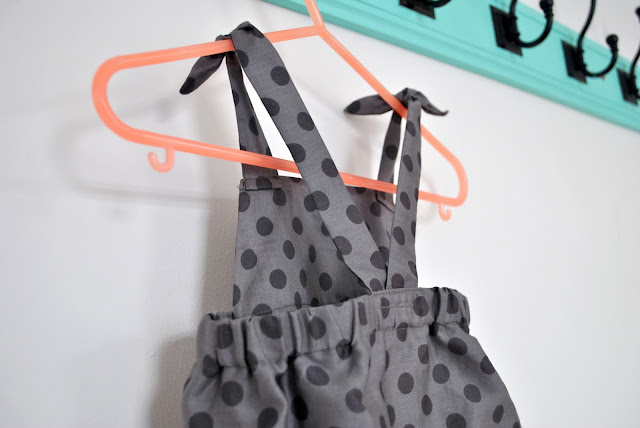
So there you have it, one gorgeous little romper that took me days to make but will most likely get puked on within moments of being worn! Haha. Guys that's just something I will have to get used to very quickly... :)

It's been absolutely baking August here in Blightly (so unusual!) so I figured a little light romper would be exactly the thing to welcome baby home in. (Okay, so I know full well this little munchkin isn't going to give two hoots about it's first outfit! But, I have a sneaky suspicion that I sure will!)


I created my own newspaper pattern by drawing around each panel of an existing romper we were lucky to inherit. I simply added a seam allowance around the outside of each panel as I went along. Then I tried to follow it's structure to make this one. Sometimes it's a little tricky to work out what order to sew things up in, but a spot of unpicking here and there never did anyone any harm did it?!?! ;)

I changed ups few things, for simplicity's sake! For example the original had button fastenings not the front, which I switched for simple tie straps - in fact I love the cute little ears on the knots at the top of each shoulder so I think that worked well! Also, the original had a single strap that split half way up the bag, which I simply switched for two separate ones going directly from the waistband. Again, don't think we've lost anything there.

Since we have no clue what sort of size our sprog will arrive at, I was paranoid about spending hours slaving over something that would never fit! I also have no clue whether the template romper was large/small for it's size, so I was generally pretty generous with my pattern adding a fair cm to the important spots to make sure it gets at least ONE wear!!! Figured it can always grow into it...
For comparison purposes here's a shot of them both side by side:


So there you have it, one gorgeous little romper that took me days to make but will most likely get puked on within moments of being worn! Haha. Guys that's just something I will have to get used to very quickly... :)
Monday 22 August 2016
The Great British Seaside: Margate Photo Walk


Margate is a lovely little example of a quintessential Great British Seaside town. It's got a large sandy beach (a rarity!), a fun promenade, lots of little cafes and fish and chip shops. What's more it's got a particularly arty, retro vibe with the renovated Dreamland fairground area, a host of vintage stores and the Turner Gallery. All in, it makes a GREAT destination for a day-trip from London and that is exactly what we did.


Here are my five key must haves for a quintessential British day out at the seaside along with some of the wonderful colourful snaps I took during the photowalk:
1. Seaside Grub

Later we also had a super delicious ice cream - mint choice chipped mango sorbet. Yum! But Margate had so much more on offer, and all worth sampling!

2. Paddling (or swimming for the very brave!)

No trip to the seaside is complete without braving the water. Remarkable, when it's windy and rainy, the water actually feels relatively much warmer!! Luckily, on this trip we were blessed with sunshine so a paddle in the shallows was no hardship at all. Phew!

3. Sheltering from the wind (or rain, or sleet, or any other extreme weather events!)

British beaches are always littered with wind breaks and umbrellas. And not simply to keep our white bodies from burning as might initially be assumed. No, these perfofrm another very important function - they create a small space with respite from the whipping wind and blowing sand. Worthy of note is the fact that no matter how wind-tight your barriers, you will still find sand in every crevice, sarnie and ice cream to provide that added crunch!
4. Plastic tat


5. Arcade Games

Most traditional is the cheap and garish 2p or 10p machines ubiquitous to every pier and promenade in the UK. My sister is a 2p machine fiend, always has been since a tender young age! Whenever we went to the beach as kids, Izzy would collect 2ps for days in advance and make a bee-line for the arcade machines as soon as humanly possible! Margate is a little bit more special as Dreamland actually has a vast collection of vintage games machines that are both fun AND look good!


Dreamland is a wonderful step back in time, it's an old pleasure park that is chockablock with vintage rides and games that have been restored and opened for the modern day seasiders! It's only a few hops from the beach and is a retro feast for all the senses, and as you can imagine, a treasure trove for a photowalk... :)


Whether it be Margate or any of our other wonderful seaside towns all around this British island, its still not quite the end of the summer holidays and this coming week is forecast to be an absolute steamer - so, grab your swimmers, jelly shoes and wind-breaks (just in case!) and get yourself and all your loved ones down to the Great British Seaside to celebrate our highly unpredictable but totally lovable British Summer in super style.


If you know of any other British seaside towns that you think I'd love, let me know so I can add them to the list and try and squeeze in a few more visits before the summer's out!
Subscribe to:
Posts (Atom)