Sunday 7 January 2018

Christmas Prep

I sort of think of this as being our little lady's first proper Christmas. Although she was around last year, she was so teeny tiny back then that she didn't really have a clue what was going on! But this time round, I was SO EXCITED for her Christmas. I'd probably go as far as to say think was maybe the most exciting Christmas I remember!


These were from our afternoon decorating our Christmas tree. As you can see, she was much more interested in the notebook than the sparkly baubles tinsel and lights. Huh?! So as it turns out, maybe we have a little bookworm on our hands.


Plus she insisted on wearing her hoody AND her coat indoors. We didn't have the fire lit (in fact, we've still not lit an open fire just yet with her bull-dozing around the living room!), but I promise it wasn't freezing cold inside. Quite the opposite, we've actually gone a little soft with the heating in our old age!


And a couple of us both, just because, well, she looks so excited here - finally mustered up some Christmas cheer, yeay!! Go Gigi!!


Despite all my excitement, we didn't go overboard, just a small stocking and two presents from us under the tree. So happy to be back in this phase of our lives when Christmas is a big deal. It's true what they say about Christmas being so much more fun with children in the family. It's hard not to get swept up in it all! And it'll only get bigger and bigger for this little lady over the next few years, I'm sure. Well if that's the case, sign me up right now. I am in for them ALL! 

Wednesday 8 November 2017

Glamping


What better, on a mild October weekend, than to up sticks from the city and congregate with a wonderful bunch of ladies in the heart of the beautiful Surrey Hills. We descended on Surrey Hill Yurts, set on the edge of the woodland with views over the valley, to celebrate the hen do of our lovely friend Anneke. We filled two large 30 foot yurts and had a fabulous weekend filled with fresh air, campfires, welly boots, gems, glitter and flower crowns, girly chats, spiced drinks, home cooked food and long hikes. Fabulous stuff!


The beautiful setting for our adventure. The yurts felt a little bit like hobbit houses, just for normal sized people! I love how they blend so easily into the landscape and the morning mist. Once inside they are spacious but snug, beautifully decked out with wooden furniture and a log burner each!


On the inside of the yurt, you can see the craftsmanship that has gone into their creation. So so beautiful! Over the weekend we deliberated long and hard how we could acquire one of our own as a weekend retreat...


LOVED the size of this ginormous handmade bed, isn't it fantastic?! And doesn't it make the girls look teensy tiny, almost hobbit sized tucked up all cosily in there? And yes, that might be a bed pan tucked under the left corner...well you know...when it's dark and cold outside...


As well as being a spot for weekend retreats, Surrey Hills Yurts is also a working farm. There were at least two separate litters of piglets squeaking and squealing away in their pens. I  fell in love with them all and spent faaaar too long sitting with them and snapping away with my camera. Lucky for you I've whittled them down to these two favourite snaps (I figured a whole post of piglets might be a little more than most people's tolerance levels!). And lucky for them then get to munch on such yummy green looking grass and with plenty of space to run and play.


Certainly made the bacon butties at breakfast a little harder to swallow, I'll be honest.


The chickens roamed the field and seemed most content to huddle up against the compost loos! I'm guessing there was a certain natural warmth emanating from in there somewhere!


These are the compost loos, if you can imagine?! They were fabulous - made almost entirely of raw sawn wood panels and with lots of vintage finishing touches such as this huge old basin, stained glass windows and vintage mirrors. Not quite the sort of camping I'm used to in the French municipal camping sites of my childhood - those dreaded holes in the floor!!


So, there we are. How far we've come! So it only remains for me to say the biggest thank you to Surrey Hills Yurts for having us and all the lovely hens for making it such a treat of a weekend. I'll share a follow-up post with a few of the antics we got up to in the next couple of days, so check back!


Monday 16 October 2017

Fields of Lavender


On my goal list for this year I had 'return to work gracefully'. And I'm not exactly convinced about the graceful bit, but I am firmly back at work. My year of maternity leave with GG has been truly magical, but this feels like a return to normal life. Our 'new' normal. And with it, a return to knicker elastic fantastic too! 


These photos are from a visit to a Lavender farm a little earlier this year. As the end of my maternity leave drew near, I was determined to make the most of every last minute. Eek out as much fun and games as possible and make every minute count! Top of my hit list of 'must-dos' was this little outing - a trip to the Mayfield lavender fields. It's so lovely to get out of the city proper, even if just for a few hours of greenery, fresh air and flowers! 


Hard to imagine we're in South London and not the South of France! It felt like we had been teleported all the way over the channel and landed straight in Provence. Magic! 


We brought along our absolute favourite person for our afternoon out and together we spent HOURS in the lavender field, hehe! We spent it exploring and crawling down the rows, filling our lungs with their heady scent, dodgy the gazillion buzzing critters, playing with out cameras, picking at the grass, tasting the flowers (!), singing and dancing. What could be more relaxing? 

And as a bonus, we came away with a sim card full of purple pictures. Get in! These are my absolute favourites, I know it's a long post - but I don't mind telling you that even whittling them down to this big bunch was agonising! Anyway, here we go...


A fragrant al fresco meal amidst the blossom. Now that GG is fully weaned, these are pictures I shall treasure forever. 


This wasn't the peak of lavender season, it was the tail end of the season, the blooms were just over their best. But just look at those colours! Amazing! 


Her royal wave. That's all for now folks. Byeee!

Saturday 28 January 2017

Baby GG Loves Murals


Over the last four months, GG and I have been on many an adventure. We've explored neighbourhoods near and far, hopping on and off buses, taking the back streets whenever we can and most importantly searching out our local gems and finding beauty in the streets, doors, walls, gardens and floors we see. I started documenting some of the best bits we found and like all adventures it has evolved over time. So what started out as a simple snap of GG in front of a local wall (above) eventually became a mural hunt all over London Town! 


I've shared a few snaps along the way on Instagram (@knickerelasticfantastic), but I wanted to round up all my favourites into a little post here. This cute little carrycot was an old Oyster Max Vogue collaboration that we were lucky to score secondhand on eBay. But alas, GG has moved up from the carrycot to her new big girl buggy. So, this post is to commemorate the last five months of adventures with her!


I LOVED this carrycot for it's tiny size, cute shape and fun monochrome spots and stripes! Little GG also loved it - she's spent so many hours staring at the little spots inside the hood. She'd even crane her neck to stare at a particularly hard to see spot right behind the back of her head (like it's different from all the others?!). Now that is commitment to spot staring. What's more, it's also rather photogenic...particularly against a mural with the same spots and stripes!! 


Rather than my daily train commute each day (erugh - not at all reluctant to take a break from those), walking is our new modus operandi. We have powered around the parks, up and down the hills, meandered, sauntered, sidled, sashayed, hopped, hovered, shuffled, jogged (for buses!) and all of it has been so refreshing. It's a total shift in pace, to walk for a walk's sake, rather than to get somewhere (in a hurry!). It's opened up our eyes to our surroundings, connected us wth other locals and meant we've experience the weather first hand. 


Some have been old favourite walls and walks we have visited before. Others have been new discoveries just hiding around each corner.


Not strictly a mural, but a lovely brick wall weighed down with magnificent orange berries in Greenwich. This was from our first proper day-out as a family and this wall here just screamed 'Autumn' so we had to stop for a snap (and don't I look happy about it). 


One of my favourite things about this one is the Christmas wrapping paper under the pram. Busted! This little buggy became an epic workhorse, often piled high to the rafters with groceries and shopping while little GG remained tucked up fast asleep inside!


Some of the less salubrious parts of our neighbourhood also make for fun backdrops - like these doors on their side used to create a makeshift fence. Love it.


Dwarfed by the Old London in the Wast End. Doesn't she look teensy tiny here?!


This sunshine yellow wall makes me happy (can you tell?!). Especially in the depths of a London winter. As an antidote to the dreary Britih greyness, all Londoners should make a weekly pilgrimage to this happy wall in East Dulwich to up their daily dose of vitamin D!


Not strictly a mural this one either, but I loved this hedge of red in the autumn that we found in South Norwood. The leaves were already dropping by this point, so past its best really, but still gorgeous! 


So, adieu to the carrycot, but hello to our growing baby girl. There are still sooo many more areas to explore so we shall not stop here but continue our adventures on foot around South East London, racking up the step count as we go! And I can only hope that the two of us will have just as much fun over the next five months as have had over the last five together. 

Tuesday 18 October 2016

Video Diary - Greece 2016

I am an insatiable photographer. I have the fear...you know the fear that if you don't capture that perfect shot as and when you see it, you may never come across a moment like it again! Yes that fear that drives me to constantly whip out my phone or camera at EVERY opportunity!! There, I've said it. Feels like a huge weight lifted off my chest, just to say it loud. Mr Fantastic hates this habit. He takes a photo once a fortnight. But then he is obsessed with BBC Sport, which he checks every 3 minutes. So there is that.

Every now and then its good to switch things up. We are incredibly lucky to have FAR too many lovely holidays in Greece (as seen here!). So on our last trip (before Baby Fantastic joined the family!), rather than simply add to the terabyte of photos I already have of all the Greek Islands, and all the colourful fishing boats on said Greek islands, I decided to do something a little bit different. So instead I captured our trip through a series of short video clips. Again I ended up with hours of footage and a phone with NO memory left, but having sifted through them to pull out all the gems, I've pulled them together into this little video:


Aquila Ionian May 2016 - med from Marian Needham on Vimeo.

So now I'm off to experiment with capturing more videos. It seems I may have simply switched one unhealthy obsession for another (very similar one!). Seems you can't win them all. ;) 

Wednesday 12 October 2016

DIY - Pom Pom Mobile

This is a lovely simple DIY that is simple, fun, a little addictive and can produce gorgeous results. I had been hankering for some pom-pom action for a while, so when I stumbled across some pom-pom based mobiles on Pinterest, I decided to dive in.


I used a series of wools that I found in our local charity shops and discount stores (no doubt there are a few acrylics in there, but these are not for wearing next to the skin so I was less concerned about that). Once I'd found a colour combo I was happy with (and was unisex, since at this stage we don't know if we'll be blessed with a baby boy or girl!), I dove right into the pom-pom making.


This is perfect crafting to do in front of the tv, on long haul flights, or long train journeys, during down time or on a chilled out holiday. I started ours on holiday in France with the family sat around the pool and sheltering from the midday sun. (I should caveat this - it was BEFORE our munchkin arrived, trying to fit in a gazillion pom poms into our daily routine now would be quite a feat!)

In fact, it became a full on family affair - everyone helped by creating a pom pom each and they are ALL included in the final article, even those made by our adorable 3 year old nieces and nephews! I love the fact that I can point out which pom pom each of them made. It's all the more special that everyone was able to contribute to something our little munchkin will hopefully come to love and stare at just as much as us!

So, gather any back-up you can find...family, friends, pets and start pom-poming (yes I did just turn that into a verb, embrace it). 

Here are the key steps for the process:

1. Gather your supplies.


You will need yarn in the colours of your choice. I chose 5 colours and probably used about half of each ball of wool for this project (for about 30 fairly small pom poms). So depending on your ambitions, you can adjust accordingly! 

I also used cardboard (from a handy cereal packet) and a large fork (our pasta serving fork in my case!) as my templates for the pom pom making. 

You'll need the usual basic suspects like fabric scissors and a chunky needle.

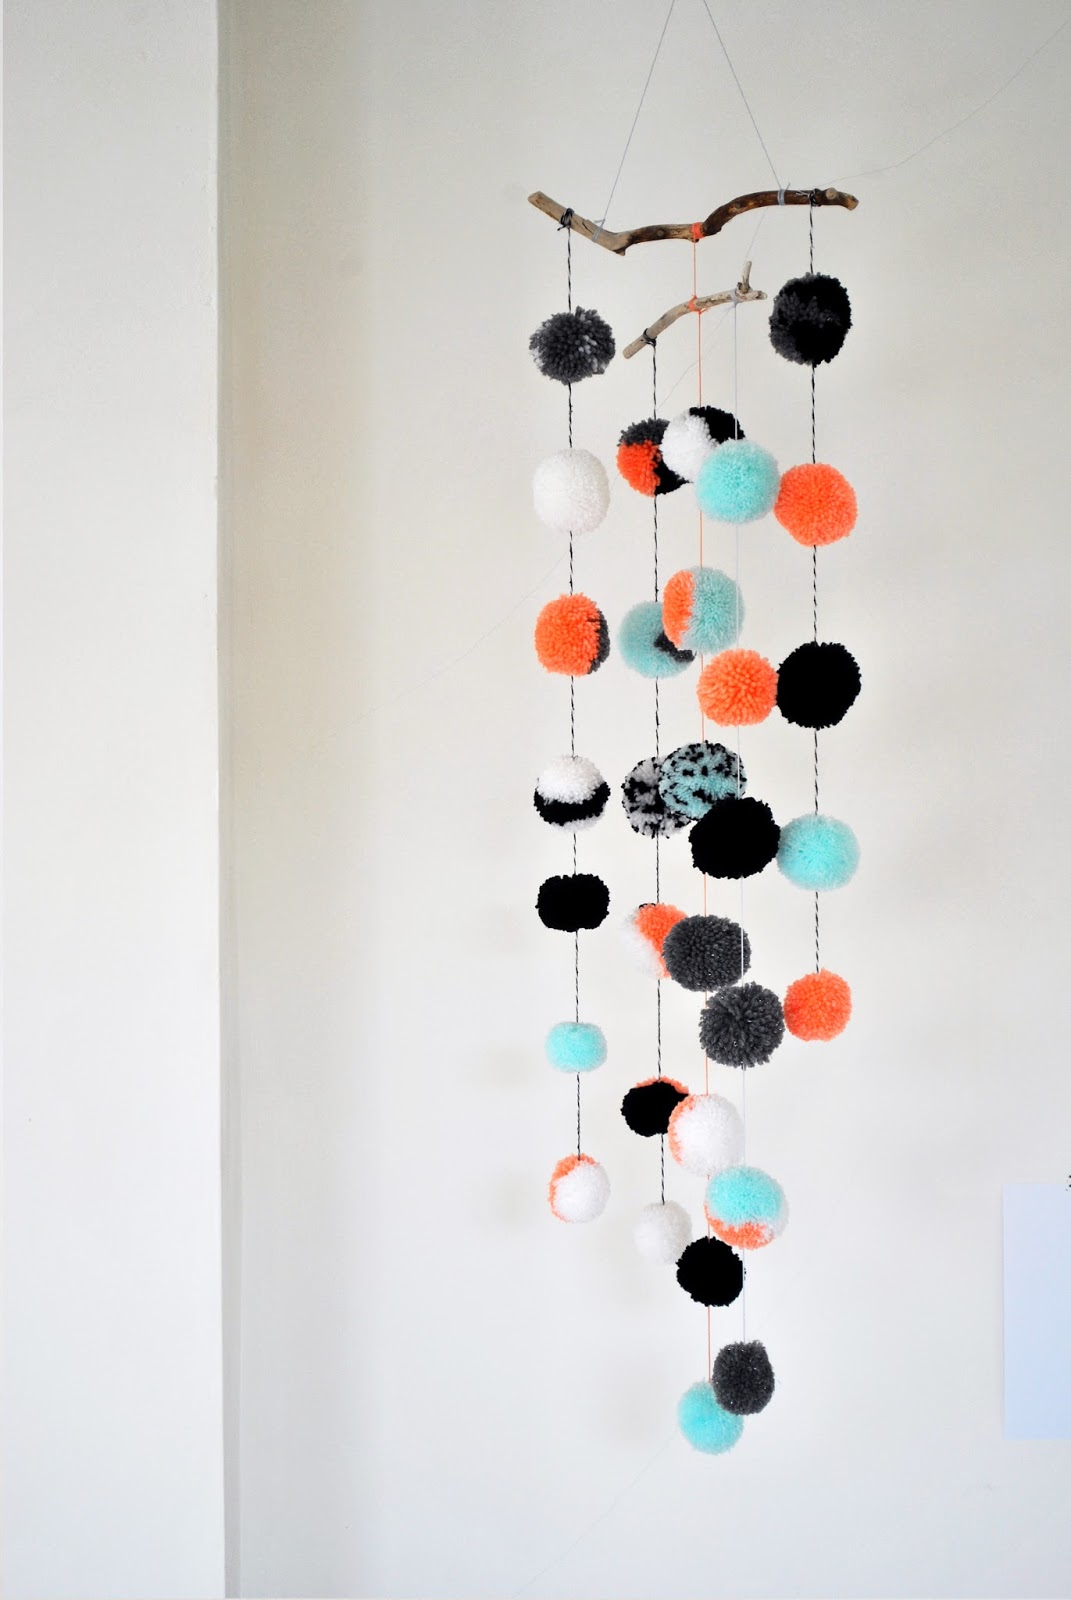
And finally you'll need something to hang your pom poms from. This could be some small pieces of drift-wood as in our case, or a embroidery hoop or a hanger moulded into shape etc. Anything you can hang from the ceiling and tie your pom poms on to will do the trick! 

2. Create a cardboard template. 


To create the cardboard template I simply cut out a circle in the desired size out of think sturdy cardboard. You'll need two perfectly matching circles. Then cut into the centre and remove a slightly smaller circle from the middle.


The diameter of the cardboard will roughly equate to the diameter of your pom-poms at the end of the process, but this is just a guide. You can trim your pom poms afterwards to any size you like.

Starting in one spot, wrap your yarn around the cardboard template slowly working your way around the full circle.


Keep going until you can't squeeze any more yarn on! The more you fit on, the fuller and more bushy your pom poms will be. But if you are looking for a looser, less full look then you can keep your wrapping sparser. It's great to experiment at this stage to get the look you want.


Once you have a full template, take your fabric scissors and snip your way around the outside of the circle, using the split between your two cardboard rings as a guideline to keep you on track.


Finally, to secure your pom pom, take a short piece of yarn, wrap it between the two cardboard circles and then tie tightly in a knot. This should collate all the short strands of the pom pom together and allow you to ease the cardboard circles off without the whole pom pom falling apart! 

Then ta-da you have your first pom pom!

3. Or find a large fork for smaller pom poms. 


I ended up creating poms of two different sizes - larger ones at about 2 inches in diameter and slight smaller ones at about 1.25 inches in diameter. But you can experiment with and shoes and sized you fancy. I found that our pasta fork worked superbly for the slightly smaller sized poms, so raid the kitchen to see what you can find!


In this example simple wrap the yarn around the widest part of the fork prongs as in the above image. 


Once you have as much yarn wrapped around your fork head as is possible, then tie a short length of yarn around the bulk of the wrapping and secure as tightly as possible. You can then slip it off the fork prongs to leave you with a neat circular wedge of yarn like this:


Finally take your fabric scissors and snip your way around the longest part of the yarn as you did before with the cardboard versions. And that's it!


4. Trim

Your raw pom-poms will likely look a tad shaggy and lopsided once you've cut them off the template/fork. This is where you need to get creative with the scissors and even out the pom poms into nice smooth balls. Alternatively you could opt to leave them all (or a few) more shaggy or lop-sided if you want a more relaxed, alternative mobile. I have seen some of these done really beautifully.

5. Build up a stash of pom poms


Your stash can be as large or as small as you like (or you have time for!). Just be warned that pom making gets a little addictive after a while so it gets harder and harder to stop!! You can keep your poms in block colours, or experiment with combinations, patterns and textures.


6.  String them up

Finally, once you're happy with your full selection of pom poms, tit's time to start stringing them up. You can use bakers twine, embroidery threads or simple sections of the wool you used for the pop-poms to do this. I experimented by laying out the poms in four of five strings to try and visualise the pattern/shapes they would make. Once you're happy with your arrangement you can start to string them up. 

I found the easiest to start with is the bottom pom. I made a large knot in the end of the hanging thread and then used the final tied-off yearn on the pom pom and knotted it around the end of the hanging thread. This means the large knot stops the pom pom from slipping off and the pom pom is securely fastened in the middle on the pom to ensure it hangs evenly. 

For the rest of the poms on each thread, I started by creating another knot right at the height I wanted the pom to rest at. I then used a large needle to thread the hating yarn through the centre of the next pom. The knot created stopped the pom slipping right down on top of the previous one.

Repeat this final step until you have your desired number of poms on your having thread. Mine ranged from a bout 5-8 as I was keen to keep them all different lengths for visual interest. 

7.   Bring it all together


Finally attach each of your hanging threads to your drift wood, experimenting with the arrangement as you go until you are happy and tie them off tightly. I found it suprisingly easy to get the drift wood to balance - you can simply move your having threads in or out along the driftwood until they balance and the driftwood stays horizontal. Not that this is essential - some funny angles all add character! 

8. And Hang!


Last but not least, hang your beautiful new creation. I'd heard that it's not a great idea to hang mobiles above little people's cots, so as an alternative we hung this above our changing station as the little one will always be supervised on here but is likely to need some distraction as we expose it's bare bottom for cleaning!!


Then sit back (or lie back if you're the little one) and admire the finished article. Ours only takes a tiny movement to keep it spinning and dancing for ages - a sure fire distraction!


Finally, here we have it in action below!


If I'm completely honest, I thought this mobile would be purely for my fancy and to decorate the nursery, rather than actually get any real use. But the little lady loves it and is fascinated by it hanging above her changing station. Thankfully it really contributes to our calm, peaceful nappy changes! Phew!