Thursday 28 May 2015

DIY Fantastic: Guerrilla Gardening

I've always joked about becoming a  Guerrilla Gardener. The idea of throwing wildflower bombs over fences into abandoned lots or neglected gardens and seeing the results grow and blossom always sounded like such a lovely antiestablishment act! And let's face it, as a goody-two-shoes at heart this is about as rebellious as I was ever likely to get! 


Finally, these long-harboured dreams have been turned into reality - there's really is nothing quite like getting a foot on the property ladder to get you invested in your local community and street improvements! Ha!


So tonight, I ventured out on to our street armed with 101 nasturtium seeds, a trowel and a watering can on a one woman mission to brighten up our street! Oh and I dragged the husband along to carry the watering can! (I think he enjoyed it, at least the guerrilla part at least!) 


We planted a handful of seeds under each tree, in the scrappy square of soil around each tree trunk. Created a series of trenches in the greyness and popped in a nasturtium seed or three into each. Covered them back up with a sprinkling of soil (aka dust and twigs) and watered thoroughly before moving on to the next tree.


And that's it. We now get to sit back and wait a while and hope for more rain! Each day I'll walk to the station hopeful of seeing my handiwork start to spring out of the earth. First as a teeny seedling, then grow into a strong little bushes and eventually burst into a root of colourful flowers! Hmm...we'll see! 

It's sure going to be a test of my patience mind! By the virtue of my daily walks in sure it'll feel like they're taking FOREVER to come to fruition, as I watch them grow a millimetre a day! But with the days and weeks, hopefully they'll bring a flash of colour and life to our already cute street over the summer. 


We picked nasturtiums as they are hardy, love scrappy, poor soil (which is what they're getting!!). They are bright and fun and hopefully easy to grow with very little tending! My ma bought out the pound store of nasturtium seeds last time she visited to stock us up in advance!!

As for hazards of the job, we got down and dirty with all sorts, the cigarette buts, the bottle tops, the dried dog poop (extra nutrients?!) and all sorts of natural debris. We both wore gardening gloves for the job and were super careful. Said gloves even got a deep bleach clean afterwards and I must have scrubbed my hands about four times before I was satisfied! Our remaining natural foes will now be the council weed-killing men (please don't do the rounds soon), dogs and drought! I don't often say this, but...bring on the rain!

I'm desperately hoping to one day spot a neighbour or visitor admiring the new addition to the street so that I can glow smugly on the inside knowing that each small change like this will help make our street a better place to live. (I'll report back if we manage it!)

So, what small steps have you tried to help contribute to your neighbourhood? I'm all ears - we need our next project!

P.s. you can see more about our first step onto the property ladder here and more gardening updates here.

Monday 4 May 2015

DIY Fantastic: Hallway Hooks

Does anyone else also have a fear of becoming a hoarder? Or is that just me?! Since visiting our upstairs neighbours years ago and finding her flat literally stuffed to the brim with all sorts of gubbins, it's been haunting me! My fear is made all the more real by my love for pretty but useless things and car boot sales! (What a toxic combination!) 


I had been hoarding these four gorgeous coloured hooks since early last, they'd always been destined for a coat rack and so it was time to put them into action! 

With no place for coats, keys and the usual paraphernalia they usually ended up as a mound on the end of the banisters or piled up on our sofa. Great for snuggling up under in winter, but not when you're in a rush to leave the house and scrabble through the pile looking for my favourite leather jacket!
So the solution was to create a hook shelf combo to come to our aid! 


We have also been hoarding (spot the trend here!? Maybe I should just give in and embrace it!) a pile of salvaged wooden floorboards from when we renovated the floors upstairs. They look super rustic here, but under that paint and grime the wood is really lovely old pine, beautifully worn and weathered! 


First we had to dry it out - which meant bringing in the damp and dirty boards into the bathroom for a few days. We then decided on a length, sawed then down to size and sanded off the grime. As you can see here, I brought in some muscles for this part!! 


'We' didn't sand them down fully, I wanted to keep some of that beautiful ageing that gives the wood texture and depth. But we did sand off the edges and corners to leave them smooth and splinter free. 


Once happy with the wood, we measured out the four spots to add the hook, evenly spaced along the plank and screwed them each in place.


The hooks I found in Tiger whilst shopping for wedding decor, ha! Tiger don't sell online (what sort of business model is that in this day and age?! Even TKMaxx, the ultimate designer jumble sale, and possibly,aherm I mean definitely my favourite shop of all time, sell online these days!) but you can see similar ones available in store here.


Here you can see that lovely texture  of the wood, yummmm!! 


We drilled a few holes along the wooden back. Think we opted for 3 or 4 to keep it secure. Measured out and drilled matching holes in the wall and then up it went!


Not entirely sure why we used the spirit-level - I swear there is not a single straight line or 90 degree corner in our house, it full of all sorts of curves and crazy angles!! Thank you London clay (but it is marvellous for the roses!).


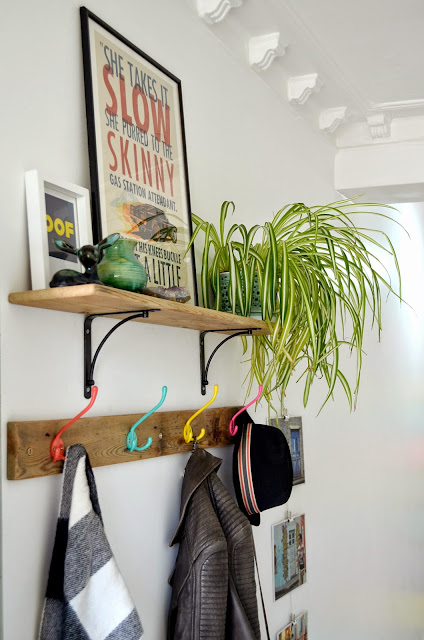
We used the second plank to add a small shelf up above the hooks to keep the dust off our coats and add some plants and pretty things! We used simple black brackets and followed a similar process to adding the hooks. 


And there we have it, four big and bold hooks that bring a little (more) colour into our hallway! I bought these loooong before adding colour to the stairs, but by adding colours in a similar palette at the other end of the hallway, they tie things in very nicely.


On the shelf we added some car boot sale treasures and framed art - including a print I bought Mr Fantastic as his wedding present. I'd been lusting after this print by Clare at Tiger Food Press for months, the quote is brilliant and the mustang is one of our inside jokes!


For the meagre few pounds I spent on hooks, we now have a bespoke fixture that adds oodles of character to the hallway. I particularly love that the wood we used may even have been the original flooring when he house was built back in 1890, it certainly had enough layers of paint!! And now with a new lease of life, it can continue to contribute to the house's history! (Blimey, getting a little over sentimental here - got to remember this is a just plank of wood I'm harping on about here!!) Plus we now have somewhere to hang all our layers as we enter the house. Pretty AND practical - WIN!!!